Raspberry PiでNTP時計作成メモ
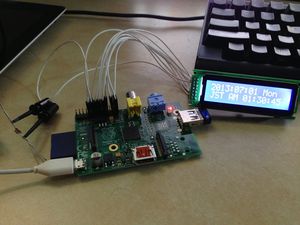
Raspberry PiでNTP時計を作りました。時刻の表示には秋月電子のLCDキャラクターモジュールを使用しました。

Linuxの書き込み
OSはDebianベースのWheezyを使用しました。イメージファイルはRasberryPiサイトからダウンロードを行いました。
ディスクイメージの書き込みに使用したソフトはWin32DiskImagerです。
OSの初期設定
初回起動時に以下の設定を実施。
1.Expand Filesystemを実行しSDカードの容量最大まで/パーティションを拡張。
2.Change User Passwordを実行しrootのパスワードを変更。
8.Advanced Options -> A4 SSH -> Enableを設定し、SSHを有効化。
無線LANの設定
PlanexのGW-USValue-EZ 802.11n Wireless Adapterを使用しました。
まずUSBポートに無線LANアダプターを挿入し、USBを認識していることを確認します。
pi@raspberrypi ~ $ lsusb
Bus 001 Device 002: ID 2019:ed17 PLANEX GW-USValue-EZ 802.11n Wireless Adapter [Realtek RTL8188CUS]
Bus 001 Device 001: ID 1d6b:0002 Linux Foundation 2.0 root hub
次に無線LANルーターに接続を行います。まずSSIDとパスワードを設定します。
root@raspberrypi:/home/pi# wpa_passphrase SSID PASSWORD > /etc/wpa_supplicant/wpa_supplicant.conf
使用してる無線LANルーターがステルスSSIDの設定になっているため、wpa_supplicant.confにscan_ssid=1を追記します。
network={
        ssid="SSID"
        psk=c2161655c6ba444d8df94cbbf4e9c5c4c61fc37702b9c66ed37aee1545a5a333
        scan_ssid=1
}
次にネットワーク設定を行います。/etc/network/interfacesに以下の内容に編集します。使用したRasberry Piには有線LANが付いていないため、ethの記述は削除しました。
auto lo
iface lo inet loopback

allow-hotplug wlan0
auto wlan0
iface wlan0 inet static
        address 192.168.1.128
        gateway 192.168.1.1
        netmask 255.255.255.0
        dns-nameservers 192.168.1.1
        wpa-conf /etc/wpa_supplicant/wpa_supplicant.conf
ここまでの状態でrebootすれば自動的にネットワークにつながるようになり、SSH接続が可能となります。
NTPDの設定
/etc/ntp.confにserver ntp.nict.jpを追記しNICTのNTPサーバを参照するようにします。
またローカルタイムを以下のコマンドで設定します。
pi@raspberrypi ~ $ sudo cp /usr/share/zoneinfo/Asia/Tokyo /etc/localtime
GPIOの有効化(WiringPiインストール)
RaspberryPiのGPIOを簡単に制御するのに必要なライブラリをインストールします。今回導入したライブラリはWiringPi。公式サイトの導入方法に従ってインストールしました。
pi@raspberrypi ~/work $ git clone git://git.drogon.net/wiringPi
Cloning into 'wiringPi'...
remote: Counting objects: 507, done.
remote: Compressing objects: 100% (449/449), done.
remote: Total 507 (delta 353), reused 97 (delta 58)
Receiving objects: 100% (507/507), 214.88 KiB | 142 KiB/s, done.
Resolving deltas: 100% (353/353), done.
pi@raspberrypi ~/work $ cd wiringPi/
pi@raspberrypi ~/work/wiringPi $ ./build
LCDデバイスへの表示プログラム
test.cという名称で以下のプログラムを作成しました。10ms毎に時間を取得して表示を書き換える動作になっています。LCDは4bitモードで接続しました。GPIOとwiringPi.hでのピンアサイン対応や、表示に関する制御等については公式サイトのLCD作例ページを参考にしました。
#include <wiringPi.h>
#include <lcd.h>
#include <string.h>
#include <time.h>

int main(void){
	int fd;
	char str[32];
	time_t time_now;
	struct tm *local;

	if (wiringPiSetup () == -1)
	    return (1) ;

	/* LCDデバイスの初期化 */
	fd = lcdInit(2,16,4, 10,11, 0,1,2,3,0,0,0,0);
	if(fd == -1){
		return(-1);
	}

	/* LCD表示テスト */
	lcdClear(fd);
	lcdPosition(fd,0,0);
	lcdPrintf(fd, "clock test");
	sleep(2);

 	/* 時計表示ロジック */
	lcdClear(fd);
	while(1){
		time_now = time(NULL);
		local = localtime(&time_now);
		strftime(str, sizeof(str), "%Y:%m:%d %a  %Z %p %H:%M:%S", local);
		lcdPosition(fd,0,0);
		lcdPrintf(fd, "%s", str);

		usleep(10*1000);//10msec処理を停止
	}

	return(0);
}
以下のコマンドでコンパイルし、出力されたバイナリファイルを実行します。
pi@raspberrypi ~/work/lcd $ gcc test.c -lwiringPi -lwiringPiDev
pi@raspberrypi ~/work/lcd $ sudo ./a.out
