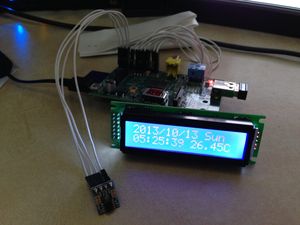
Raspberry PiでI2C温度計作成メモ
Raspberry Piと秋月電子で販売されている、ADT7410を使用して温度計を作成しました。前回作成した、NTP時計にセンサーを追加して動作するようにしています。

ADT7410の接続
ADT7410は、I2Cインターフェースを備えています。接続は大変簡単で、3.3VとGNDをRaspberry Piの1Pinと6Pinに差し、センサーのSCAとSDAをRaspberry Piの3Pin(SDA)と5Pin(SCA)に接続するだけで完了です。
Raspberry Piの準備
I2Cのモジュールを有効化します。まず、modprobeのブラックリストから、I2Cモジュールを除きます。
pi@raspberrypi ~ $ more /etc/modprobe.d/raspi-blacklist.conf
# blacklist spi and i2c by default (many users don't need them)

blacklist spi-bcm2708
#blacklist i2c-bcm2708
次に、moduleの有効化を行います。
pi@raspberrypi ~ $ more /etc/modules
# /etc/modules: kernel modules to load at boot time.
#
# This file contains the names of kernel modules that should be loaded
# at boot time, one per line. Lines beginning with "#" are ignored.
# Parameters can be specified after the module name.

snd-bcm2835
i2c-bcm2708
i2c-dev
最後にツールをインストールします。
pi@raspberrypi ~ $ sudo apt-get install i2c-tools
この状態で再起動すると、起動後にモジュールが有効化されます。
I2Cデバイスの確認
接続したI2Cデバイスが正しく認識されているかを確認します。ADT7410のデバイス番号は0x48なので、この値が表示されれば正しく接続されていることが分かります。
pi@raspberrypi ~ $ sudo i2cdetect -y 1
     0  1  2  3  4  5  6  7  8  9  a  b  c  d  e  f
00:          -- -- -- -- -- -- -- -- -- -- -- -- --
10: -- -- -- -- -- -- -- -- -- -- -- -- -- -- -- --
20: -- -- -- -- -- -- -- -- -- -- -- -- -- -- -- --
30: -- -- -- -- -- -- -- -- -- -- -- -- -- -- -- --
40: -- -- -- -- -- -- -- -- 48 -- -- -- -- -- -- --
50: -- -- -- -- -- -- -- -- -- -- -- -- -- -- -- --
60: -- -- -- -- -- -- -- -- -- -- -- -- -- -- -- --
70: -- -- -- -- -- -- -- --
プログラミング
ADT7410とRaspberry PiのI2Cは、相性があまり良くないようです。詳細なバグ情報までは調査できませんでしたが、WiringPiのライブラリやi2cset/i2cgetコマンドを使用して読み書きができませんでした。やむを得ないので、単純にC言語で直接呼び出し使用することとしました。
読み込みに関しては、4byte単位であれば温度情報(0x00, 0x01)、ステータス情報(0x02)及び設定情報(0x03)を読み出すことが可能でした。
書き込みに関しては、2byte単位で、書き込みたいレジスタ(1byte)と設定したい値(1byte)を同時に書き込むことで設定可能でした。今回は、温度センサーの分解能を13bit動作から16bit動作に変更するために、センサー接続後にレジスタを設定しています。
いずれも、試したら動いたといった挙動で正しい制御を行っているかは分かりません。
#include <wiringPi.h>
#include <lcd.h>
#include <string.h>
#include <time.h>
#include <linux/i2c-dev.h>
#include <sys/ioctl.h>
#include <fcntl.h>
#include <stdio.h>

#define DATA_NUM 10

double get_temp(int rtc){
        char buf[4];
        double temp;

        if (read(rtc, buf, 4) != 4) {buf[0] = 0x00; buf[1] = 0x00;}
        //temp = ((double)((int)buf[0] << 5) + ((int)buf[1] >> 3)) / 16; //13bitモード
        temp = ((double)((int)buf[0] << 8) + (int)buf[1]) / 128; //16bitモード
        return temp;
}

int main(void){
        int fd, rtc, i, count;
        char str[32];
        char REG[2] = {0x03,0x80}; //0x03レジスタに0x80を書き込む。
        time_t time_now;
        time_t time_prev;
        struct tm *local;
        double temp;
        double temp_arr[DATA_NUM];

        if (wiringPiSetup () == -1)
                return (1) ;

        /* LCDデバイスの初期化 */
        if((fd = lcdInit(2,16,4, 10,11, 2,3,4,5,0,0,0,0)) < 0){
                printf("[Error] open lcd device\n");
                return(-1);
        }


        /* LCD表示テスト */
        lcdClear(fd);
        lcdPosition(fd,0,0);
        lcdPrintf(fd, "NTP LCD_CLOCK");
        sleep(2);
        lcdClear(fd);


        /*i2c温度センサーの初期化*/
        if ((rtc = open("/dev/i2c-1", O_RDWR)) < 0){
                printf("[Error] open i2c port\n");
                return(-1);
        }
        if(ioctl(rtc, I2C_SLAVE, 0x48) < 0){
                printf("[Error] access to 0x48\n");
                return(-1);
        }
        if(write(rtc, REG, 2) != 2){
                printf("[Error] set register 0x03\n");
                return(-1);
        }


        /* 温度センサーの平均算出用データの取得 */
        for(i=0; i<DATA_NUM;i++){
                temp_arr[i] = get_temp(rtc);
                lcdClear(fd);
                lcdPosition(fd,0,0);
                lcdPrintf(fd, "Init.           TEMP_COUNT=%d/%d", i+1, DATA_NUM);
                sleep(1);
        }

        /* メインループ(1秒間隔で情報を更新) */
        count = 0;
        while(1){
                time_now = time(NULL);
                /* 時刻が前回時刻から変化した場合、表示更新処理を実行 */
                if(time_now != time_prev){
                        /* 時計表示ロジック */
                        local = localtime(&time_now);
                        strftime(str, sizeof(str), "%Y/%m/%d %a  %H:%M:%S", local);

                        /* 温度表示ロジック */
                        count = (count + 1) % DATA_NUM;
                        temp_arr[count] = get_temp(rtc);
                        temp = 0;
                        for(i=0;i<DATA_NUM;i++) temp += temp_arr[i];
                        temp = temp / DATA_NUM;

                        /* LCDへ表示 */
                        lcdPosition(fd,0,0);
                        lcdPrintf(fd, "%s %2.2fC", str, temp);
                        time_prev = time_now;

                        usleep(800*1000);//800msec処理を停止。上記処理が200msで終わらなくなったら修正。
                }
                usleep(1*1000);//1msec処理を停止
        }
        return(0);
}
参考文献
wsnakのブログ:I2C温度センサADT7410を使う(1)
